Notes From My GoogleTest Demo


I recently gave a demo of GoogleTest at Kjeller Software Community / Oslo C++ Users Group. These are the notes from my demo. My apologies to those who did not attend, these might not make much sense unless you saw the demo.

Installation

See my post about installation and setup of GoogleTest in your project.

Test types

TEST(TestCaseName, TestName)
A single test TestName belonging to the TestCaseName test case. The TEST macro converts this into class TestCaseName_TestName

TEST_F(TestFixtureName, TestName)
A single test TestName belonging to the TestFixtureName test case, which uses a fixture. The TEST_F macro converts this into class TestFixtureName_TestName : public TestFixtureName. You need to implement the TestFixtureName : public ::testing::Test class also.

TEST_P(TestFixtureName, TestName)
A single parametrized test TestName belonging to the TestFixtureName test case, which uses a fixture with a parametrized interface. You need to implement the TestFixtureName : public ::testing::WithParamInterface class also. Use GetParam() to get the parameter, and INSTANTIATE_TEST_CASE_P to instantiate tests.

Finally remember that you can use SetUp() and TearDown(), but might just as well use the plain constructor and destructor. A reason to use TearDown() instead of the destructor is if it might throw an exception (which destructors should not do).

Assertions

Here are some examples of assertions:
ASSERT_TRUE
ASSERT_FALSE
ASSERT_EQ
ASSERT_DOUBLE_EQ
ASSERT_LT
ASSERT_THROW

You can also write your own assertion functions:
AssertionResult predicateFunction(...)

Or just write a void function that does all the asserts internally:
void assertWhatever()

Some final tips

Use one test project per production project, for instance NoFlyListTest for NoFlyList. This makes it easy to find the tests for a project. If the rest of your code is decoupled, it might also speed up linking a lot, since you only need to link the test project, and not your entire solution. This especially helps if you are doing TDD, in which you will typically compile and link several times a minute.

Write short tests, and only test one thing per test. This will make it easy to figure out what went wrong when tests break in the future.

Write tests before you implement the code that passes them. This will verify that the test didn’t pass just by accident. It will also let you see how the failing test looks like, so you can make sure it is self-explanatory enough that someone will understand what went wrong when it breaks.

Don’t be a terrorist, you’ll end up in a bad place.

Source Code

If you want to have a look at the code from my Kjeller Software Community demo, it is available on GitHub.

If you enjoyed this post, you can subscribe to my blog, or follow me on Twitter.

Installing and Using GoogleTest with Visual Studio


Important note: This blog post is one of the top hits on Google for “googletest visual studio”. It is however quite old, and might no longer reflect the best way to use GoogleTest with Visual Studio. 

Google C++ Testing Framework (aka. GoogleTest) is a unittesting framework for C++. This post describes how to install it, and set it up in your project. I am using GoogleTest 1.6.0 here, but other versions should be similar. The instructions provided are for Visual Studio 2010, but 2012 should be exactly the same.

Installation

First of all, download the latest version from the GoogleTest download page, and unzip it. Inside, you will find a directory called msvc, which contains the Visual Studio solutions:

In this directory, you will find two solutions, gtest.sln, and gtest-md.sln. Which one you want depends on whether you are using a static or dynamic runtime. If you are unsure which one to use, take a look in your existing solution:

If you are using the DLL version of the runtime, use the gtest-md.sln solution, otherwise use gtest.sln. Before you open the solution though, make sure it is not read only, as Visual Studio will want to convert it to your version:

Open the solution you want, agree to convert the solution. Make sure you build it both in Debug and Release versions. The resulting libraries end up in gtest-1.6.0\msvc\gtest\Debug and gtest-1.6.0\msvc\gtest\Release, respectively. This is a good time to copy the libraries to wherever you keep libraries for your projects. The files you will need are gtestd.lib and gtest_maind.lib from the Debug directory, and gtest.lib and gtest_main.lib from the Release directory. In addition, you need all the headers from gtest-1.6.0\include. (Of course, you could just copy the entire gtest-1.6.0 directory and not care about which files you need.)

Setup for Your Project

I suggest to use one test project per production project. This makes it easy to find the tests you are looking for. Also, if your code is nicely decoupled, you might be able to link just these two projects, and not your entire solution. This can speed up your “red-green-refactor” cycle considerably. Finally, this makes it easy to exclude your test code from the final binary you ship. Here is an example from my Kjeller Software Community presentation:

Set the following properties for your test project:

  • Make sure to set up the test project to use the same runtime library as your production project (MT / MTd / MD / MDd).
  • Add an additional include directory c:\wherever\you\put\gtest\include
  • Add an additional library directory c:\wherever\you\put\the\libs
  • Under Linker -> Input , add a dependency on gtest.lib for your Release configuration, and gtestd.lib for your Debug configuration. Unless you want to write your own main function that runs all the tests, also add a dependency on gtest_main.lib / gtest_maind.lib, respectively. This will add a main() method to your project which discovers and runs all the tests.
  • Under Properties -> Linker -> System, set SubSystem to Console, to keep the test-window open after the tests have run.

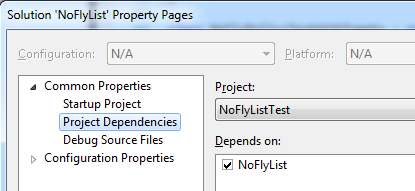
Also make sure that your test project depends on the production project:

And that’s it! Now you can start writing and running tests, but since the documentation already describes that pretty well, I will not go into that here. If you want to have a look at the code from my Kjeller Software Community demo, it is available on GitHub.

If you enjoyed this post, you can subscribe to my blog, or follow me on Twitter.

Zero-overhead test doubles (mocks without virtual)


In which I explain why some coders are opposed to unit-testing with test-doubles due to the overhead of virtual functions, admit that they are sometimes right, and present a zero-overhead solution.

(Sorry if this posts looks like a lot of code. It’s not as bad as it looks though, the three examples are almost identical.)

It is not uncommon to find coders shying away from virtual functions due to the performance overhead. Often they are exaggerating, but some actually have the profiler data to prove it. Consider the following example, with a simulator class that calls the model heavily in an inner loop:

    class Model {
    public:
        double getValue(size_t i);
        size_t size();
    };

    class Simulator {
        Model* model;
    public:
        Simulator() : model(new Model()) {}

        void inner_loop() {
            double values[model->size()];
            while (simulate_more) {
                for (size_t i = 0; i < model->size(); ++i) {
                    values[i] = model->getValue(i);
                }
                doStuffWith(values);
            }
        }
    };

Imagine that getValue() is a light-weight function, light-weight enough that a virtual indirection would incur a noticeable performance-hit. Along comes the TDD-guy, preaching the values of unit testing, sticking virtual all over the place to facilitate test doubles, and suddenly our simulator is slower than the competition.

Here’s how he would typically go about doing it (the modifications are marked with comments):

    class Model {
    public:
        virtual double getValue(size_t i); //<--- virtual
        virtual size_t size();
    };

    class Simulator {
        Model* model;
    public:
        Simulator(Model* model) : model(model) {} //<--- inject dependency on Model

        void inner_loop() {
            double values[model->size()];
            while (simulate_more) {
                for (size_t i = 0; i < model->size(); ++i) {
                    values[i] = model->getValue(i);
                }
                doStuffWith(values);
            }
        }
    };

Now that the methods in Model are virtual, and the Model instance is passed in to the Simulator constructor, it can be faked/mocked in a test, like this:

    class FakeModel : public Model {
    public:
        virtual double getValue(size_t i);
        virtual size_t size();
    };

    void test_inner_loop() {
        FakeModel fakeModel;
        Simulator simulator(&fakeModel);
        //Do test
    }

Unfortunately, the nightly profiler build complains that our simulations now run slower than they used to. What to do?

The use of inheritance and dynamic polymorphism is actually not needed in this case. We know at compile time whether we will use a fake or a real Model, so we can use static polymorphism, aka. templates:

    class Model {
    public:
        double getValue(size_t i); //<--- look mom, no virtual!
        size_t size();
    };

    template <class ModelT> //<--- type of model as a template parameter
    class Simulator {
        ModelT* model;
    public:
        Simulator(ModelT* model) : model(model) {} //<--- Model is still injected

        void inner_loop() {
            double values[model->size()];
            while (simulate_more) {
                for (size_t i = 0; i < model->size(); ++i) {
                    values[i] = model->getValue(i);
                }
                doStuffWith(values);
            }
        }
    };

We have now parameterized Simulator with the Model type, and can decide at compile time which one to use, thus eliminating the need for virtual methods. We still need to inject the Model instance though, to be able to insert the fake in the test like this:

    class FakeModel { //<--- doesn't need to inherit from Model, only implement the methods used in inner_loop()  
        double getValue(size_t i);
        size_t size();
    };

    void test_inner_loop() {
        FakeModel fakeModel; 
        Simulator<FakeModel> simulator(&fakeModel);
        //Do test
    }

That’s it, all the benefits of test doubles, with zero performance overhead. There is a drawback however, in that we end up with templated code that wouldn’t need to be if it wasn’t for the purpose of testing. Not an ideal solution, but if both correctness and speed is important, and you have profiler data to prove the need, this is probably the way to go.

As usual, the sourcecode used in this post is available on GitHub.

If you enjoyed this post, you can subscribe to my blog, or follow me on Twitter. Also, if you write code-heavy posts like this in vim and want to automate copying in code snippets from an external file, check out my vim-plugin SnippetySnip (also available on GitHub).

Modify Visibility in a Subclass to Allow Testing


In which I argue it might sometimes be useful to test private/protected methods, and demonstrate how to do it in a framework-independent way.

How do you test private/protected functions? The most common, and often correct answer is “Don’t!”. But sometimes it can be useful, especially when test-driving helper-methods. Example:

class Ohlson {
protected:
	int helper(); //We want to test this
public:
	int compute() {
		//(...)
		int n = helper();
		//(...)
	}
};


TEST(TestOhlson, helper_returns42) {
	Ohlson o;
	ASSERT_EQ(42, o.helper());
}

This will fail: error: ‘int Ohlson::helper()’ is protected. Many unittesting frameworks provide a way to work around this, like googletest’s FRIEND_TEST, but there is a way to get around this in normal C++, by subclassing to modify visibility.

In C++, a subclass can change the visibility of a derived function. This is not possible in Java or C# as far as I know, and to be honest it does sound somewhat dangerous. But C++ wasn’t made to keep you in a padded box with a helmet on, was it?

Here’s how you do it:

class OhlsonForTest : public Ohlson {
public:
	using Ohlson::helper;
};

And voilà, helper() is now public and can be tested:

TEST(TestOhlson, helper_returns42) {
	OhlsonForTest o;
	ASSERT_EQ(42, o.helper());
}

This trick can be useful in some situations, but when you are done, see if you might refactor your way out of the problem instead.

And I would be extremely sceptical to do anything like this in production code!

By the way, this trick is often useful in combination with last weeks technique on Making a Derived Class to Allow Testing an Abstract Class.

If you enjoyed this post, you can subscribe to this blog, or follow me on Twitter

Make a Derived Class to Allow Testing an Abstract Class


In which I show how best to test an abstract class, which normally wouldn’t be instantiatable.

Abstract classes are not instantiatable, so how do you test one?

class Abstract
{
public:
	int common();
	virtual int special() = 0;
};

class Concrete : public Abstract
{
public:
	int special();
};

Say you want to test Abstract::common(), like so:

TEST(TestAbstract, helper_returns42)
{
	Abstract abs; //cannot declare variable ‘abs’ to be of abstract type ‘Abstract’
	ASSERT_EQ(42, abs.common());
}

It’s not possible, because common() special() is pure virtual (it has no implementation in Abstract). So how do you test a class that cannot be instantiated? It can be tempting to test through a concrete subclass:

TEST(TestAbstract, common_returns42)
{
	Concrete abs; 
	ASSERT_EQ(42, abs.common());
}

But this is generally a bad idea, since Concrete might change the behaviour of common(). Even though it is not virtual, it operates under a different state. And even though you know it will work now, you don’t know how Concrete will change in the future, and then you don’t want tests that don’t have anything to do with Concrete to start failing. Also, creating a Concrete object when you are testing on Abstract is confusing to the reader.

Instead, I recommend you derive a class to be used just for testing:


class AbstractForTest : public Abstract {
	int special();
};

TEST(TestAbstract, common_returns42)
{
	AbstractForTest abs; 
	ASSERT_EQ(42, abs.common());
}

In this way you get rid of the unwanted dependency, and the test is easier to understand. As a final note, make sure you name your test-class something that clearly distinguishes it as a testing artifact, like I did above. Also make sure to keep it in your test code (e.g. TestAbstract.cpp), not in your production code (e.g. Abstract.h/.cpp).

Uniform Initialization Simplifies Testing


In which I demonstrate the use of uniform initialization, and show how it is particularly well suited to unit tests.

In C++0x, there is Yet Another Way to initialize objects, using the {} syntax (uniform initialization). Except, it isn’t really new, it’s the way we’ve always been initializing arrays and structs:

int i[] = {1,4,9};

The difference is we can now use this syntax to initialize any object. Why does this matter, and what is wrong with the old constructor syntax? Nothing is wrong with it in fact, and it will still see a lot of use. But in some cases, {} leads to simpler and easier code.

One area in particular is initialization of containers. It was always a bit of a hassle to initialize for instance a vector, where you would need to do something like this:

    string a[] = {"foo", "bar"};
    vector<string> v(a, a+2);

In C++0x however, you can do

    vector<string> v = {"foo", "bar"};

One area where I find myself initializing containers manually a lot is in unit tests. Here is an example:

#include <gtest/gtest.h>
#include <string>
#include <vector>
#include <algorithm>

using namespace std;

int count_sheep(const vector<string>& animals) {
    return count(animals.begin(), animals.end(), "sheep");
}

TEST(TestCountSheep, returns_zero_when_there_are_no_sheep) {
    ASSERT_EQ(0, count_sheep({"pig", "cow", "giraffe"})); //here
}

TEST(TestCountSheep, returns_all_sheep) {
    ASSERT_EQ(2, count_sheep({"sheep", "cow", "sheep"})); //and here
}

Note the calls to count_sheep(), where the container is declared and initialized in line, without any mention of string, vector or temporary arrays!

To compile this, you need g++ 4.5 (sudo apt-get install g++-4.5). It might also be possible in Visual Studio 2010 if you are so inclined. This example also uses the Google C++ Testing Framework (sudo apt-get install libgtest-dev). Here is the full command to compile and run the example:

g++-4.5 * -std=c++0x -lgtest_main -lgtest -lpthread && ./a.out

If you enjoyed this post, you can subscribe to my blog, or follow me on Twitter

Friends vs. Dependency Injections


I recently came across an interresting post on Chris’s Wiki. In short, Chris prefers not to use dependency injection for tests, but rather monkey-patch. The reason for doing this is that he “would rather have clean code and ugly tests than dirty code and cleaner tests”, which makes sense to me.

Spending most of my time in statically typed languages, monkey patching is a luxury (or should I say long rope) we don’t have, but it got me thinking whether we could do something similar in C++. Usually, people will tell you not to make your test-class (T) a friend of the class being exercised (E), since you will often end up testing for state instead of behaviour. But what if we make T a friend of E, and use that friendship only to sneakily substitute parts of E? For instance to swap out a real class it depends on (D) with a stub (DStub) providing synthetic data.

If E in production always uses the same type of D, it can instantiate D in its constructor, and we won’t have to inject an object of this type. In this case, using dependency injection would reduce readability just to support testing. If we let E set up its own D, the test can swap it out after E::E() has done its job, and the production code will have no traces of test-specific code. There are a few issues though:

If E stores the D object by pointer, we might need to manually delete the D it is pointing to before setting it to point to a DStub. (In production E would usually do this in its destructor.)

If E stores the D object by value, when we try to assign to it, it will use D’s copy assignment operator, not the one in DStub, and we will experience slicing. We of course also depend on D being copyable in the first place, but this requirement is not introduced by our test, it goes for the production code as well.

The last option, E storing the D object by reference, is only possible if we are already using dependency injection, or if something seriously weird is going on. You might want to think about why.)

Finally, and maybe most important of all, we require that all the methods in D that we want to stub are virtual.

So in conclusion, you probably shouldn’t monkey around, not even with good friends.

Appendix A, Answers to Exercises:

Why can’t we use references without dependency injection? Have a look at the following code:

struct D {};

struct E {
    D& d;
};

int main() {
    E e;
}

If you try to compile this, your compiler will complain about uninitialized reference members. A reference can never refer to “nothing” (unlike a pointer to null), and must be initialized with some object. This has to be done in the initializer list. When the body of the constructor is reached, it is already too late, as all members are initialized at this point.

How about this constructor for E then? E() : d(D()) {}; This won’t work, the object created will be a temporary, and references cannot refer to a temporary. This is one of the things that make them safer than pointers.

The only way to make this work would be to have a constructor that looks like this: E() : d(*(new D())) {};, and if it does, you have bigger issues than testability!